Configure map widget actions
For each map layer, you can specify what happens when you click, or hover over, a marker on the map or click a filter.
If the widget configuration dialog box is not already open, do as follows:
If the widget is on a Grid layout dashboard, click the Menu icon
 in the top right-hand corner of the widget and select Settings.
If the widget is on a Fluid layout dashboard, on the floating toolbar for the widget, click the Settings icon:
.
In the widget configuration dialog box, click the Actions tab.
On the left-hand side, if there is more than one layer, click the layer for which you want to configure actions.
Note
If there are multiple layers, then there are no configurations available for the parent layer. Instead, all the configurations are present only for the child layers.
The Action Configuration drop-down panel is open for you to enter the settings for a new action.
If any actions have already been created for this layer, they are listed in the table below the Action Configuration drop-down panel:
To edit the settings for one of these, click the edit icon
 and edit the settings in the Action Configuration drop-down panel.
To delete an action, click the trash icon:
 .
.
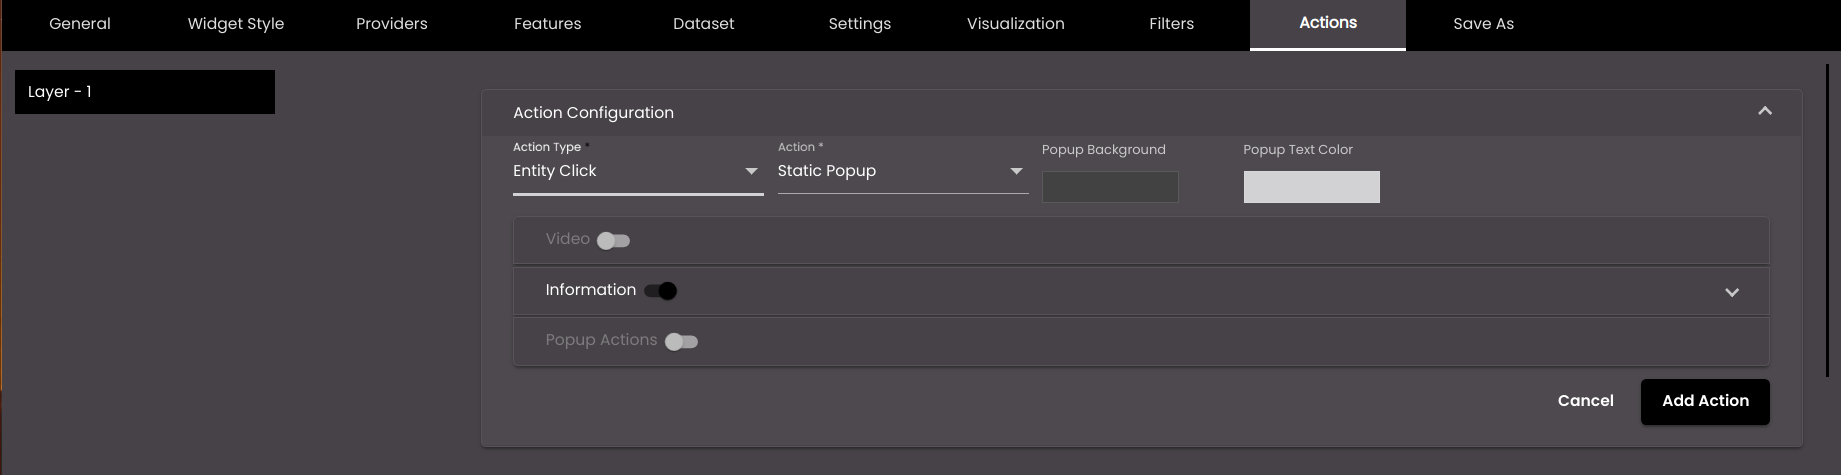
In the Action Configuration drop-down panel, change the settings as required:
Setting
Description
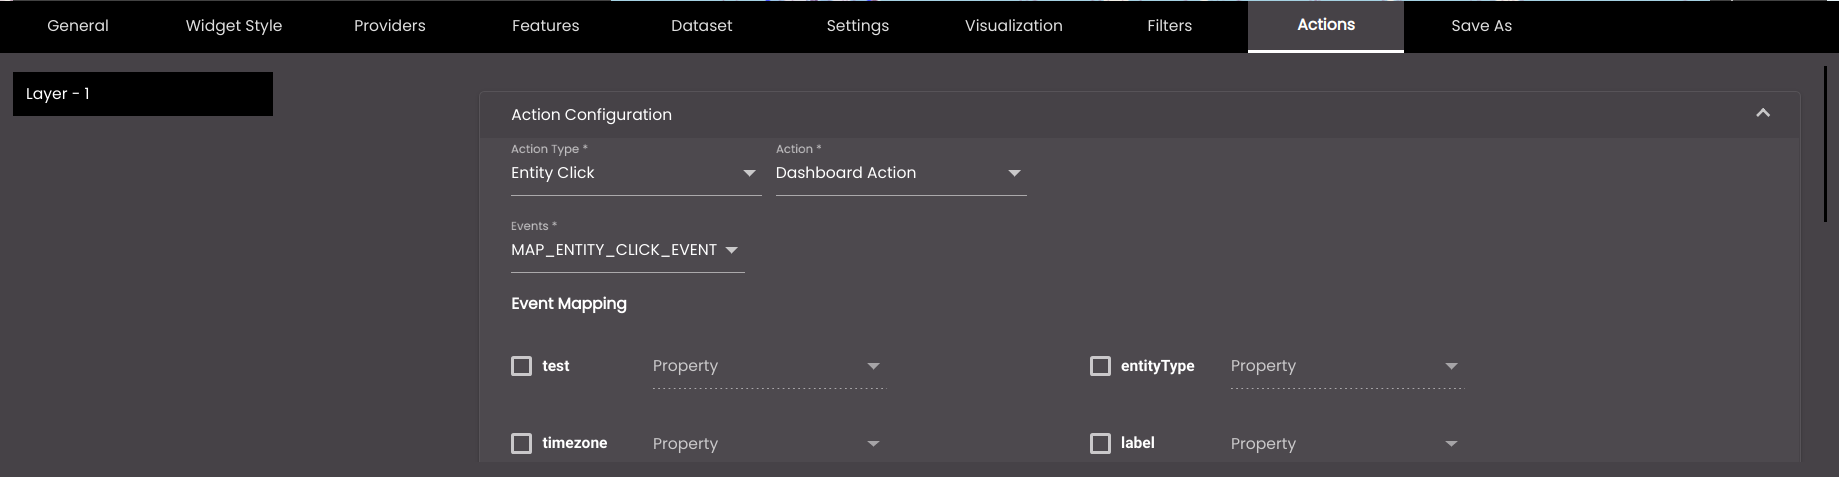
Action Type
Specifies how the action is triggered. The options are as follows:
Entity Hover An action that is triggered when the mouse cursor hovers over a marker on the map.
Entity Click An action that is triggered when you click a marker on the map.
Entity Double Click An action that is triggered when you double click a marker on the map.
Filter Click An action that is triggered when you select a filter(s) from the Filter section in the Designer Panel.
Dashboard Navigation An action that is triggered when you click a marker on the map. It navigates to another dashboard.
Action
The action that is triggered. The options are as follows:
Dashboard Action An action that is triggered at the dashboard level, to which other widgets can respond.
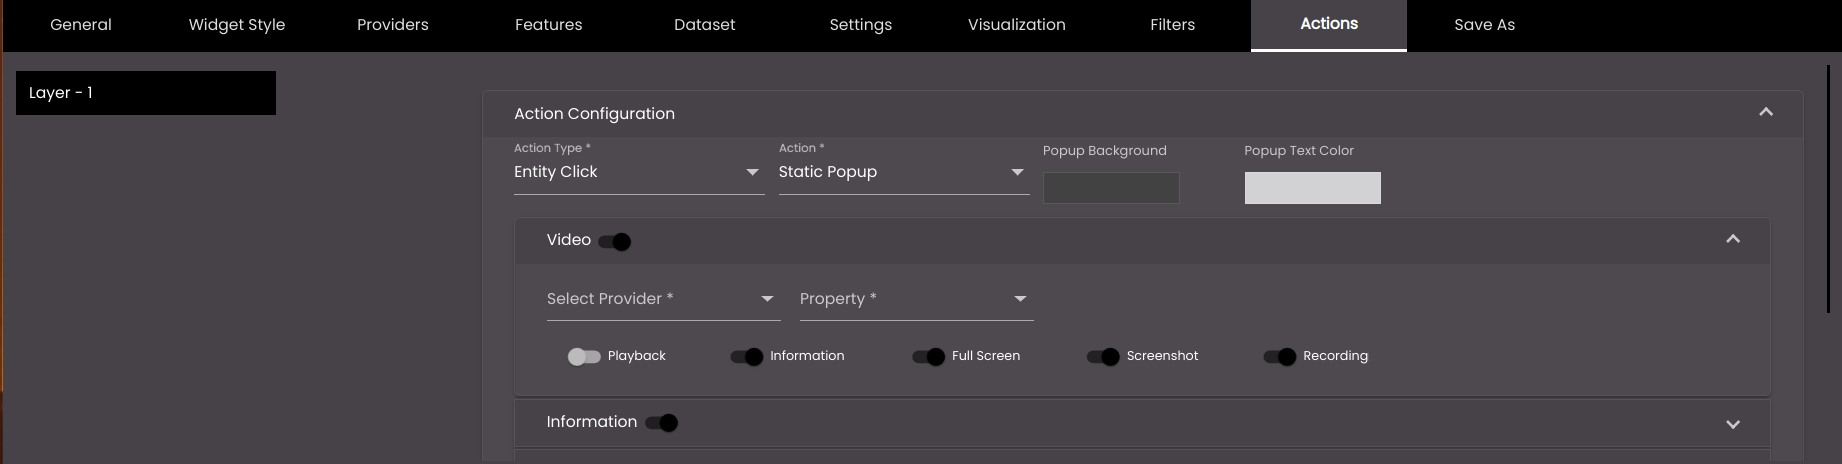
Static Popup A pop-up window that is displayed next to a marker that shows information relating to that marker and optionally enables an action to be taken. It is not applicable for the action type Filter Click.
Popup Background
The background color of the popup.
You can select any of the following colors to be displayed along with the transparency:
Solid - A single color to be displayed all over.
Linear - Multiple colors are used, where one color gradually fades and changes into another color, linearly.
The following options are available for the Linear color type:
You can select the colors to be displayed in an area of the background by clicking on the color strip and can remove the color selected by clicking on the
 icon.
icon.You can set the direction of the color progression from left to right or center or top to bottom.
Radial - Multiple colors are used, where one color gradually fades and changes into another color, radially.
The following options are available for the Radial color type:
You can select the colors to be displayed in an area of the background by clicking on the color strip and can remove the color selected by clicking on the
icon.You can set the direction of the color progression from left to right or center or top to bottom.
Also, based on the Palette in the Widget Style tab, a set of Preset colors are available to directly choose from, which if selected, change based on the theme.
Popup Text Color
The text color of the popup.
Also, based on the Palette in the Widget Style tab, a set of Preset colors are available to directly choose from, which if selected, change based on the theme.
If you select Dashboard Action, the dashboard events settings are displayed, for you to change as required:
Setting
Description
Select Events
One of the events that has been defined at the dashboard level. (For more information, see Configure dashboard events.) The default events are as follows:
MAP_ENTITY_CLICK The user clicks a marker on a map widget.
DASHBOARD.REGION_CHANGE_EVENT The user selects a different Region from the Region filter.
DASHBOARD.DATE_RANGE_CHANGE_EVENT The user selects a different time period from the Date filter.
TABLE.SELECT_ROW_EVENT The user selects a row in a datagrid widget.
DASHBOARD.LANG_CHANGE_EVENT The user selects a different language from the Language drop-down at the top of the main screen.
DASHBOARD.GENDER_CHANGE_EVENT The user selects a different gender from the Gender filter.
DASHBOARD.AGE_RANGE_CHANGE_EVENT The user selects a different age range from the Age Range filter.
DASHBOARD.GRANULARITY_CHANGE_EVENT The user selects a different granularity from the Granularity filter.
You can select more than one.
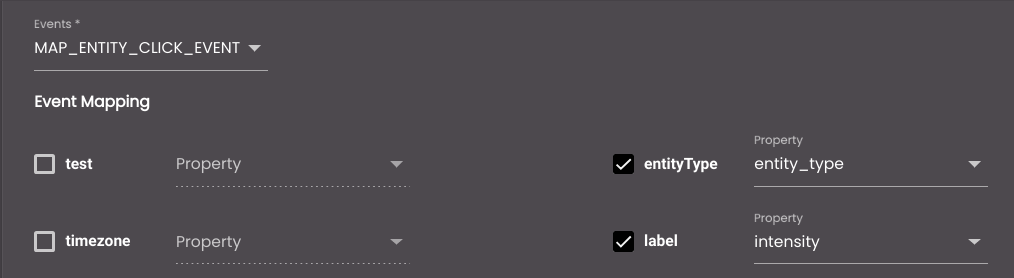
Event Mapping
The list of parameters that are passed when an event occurs. For each parameter that you want to assign a value, select the check box next to it and, in the Select Property drop-down list, select the dataset field to use to populate that parameter. The example below shows that when the user clicks a marker on the map, the values of the 'entity_type' and 'intensity' dataset fields for that marker are assigned to the entityType and label parameters respectively:
If you select Static Popup in the Action box, several drop-down panels are displayed for you to configure the pop-up window. Click one or more of these and change the settings as required.
The following settings refer to the display of a real-time streaming protocol (RTSP) video feed from the marker location in the pop-up window. Ensure that the Video slider is slid to the right so that you can open the panel.
Setting
Description
Select Provider
Select the provider for the video. The options are as follows:
N3N
Kurento
Quantela Video Management System (QVMS) Bridge
Select Property
The property in the dataset in which the video URL is stored. To find out which property to select, on the Settings tab, click the View Dataset icon
 next to the dataset. In the object hierarchy, look at the properties of one of the features. The property whose value contains the URL is the one to select. For example:
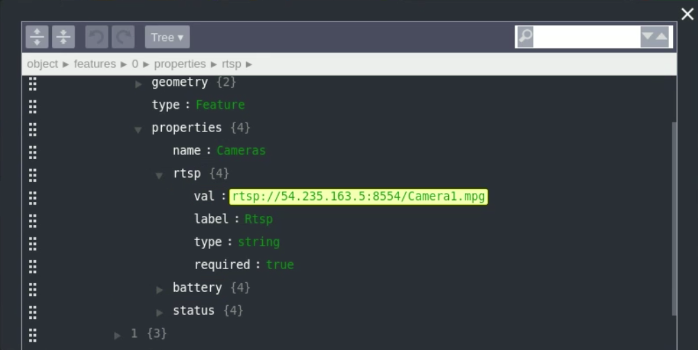
Controls
Displays controls at the bottom of the video:
Information Displays fields from the dataset for this video.
Screenshot Takes a screenshot of the video and downloads it to your computer.
Recording Starts (and stops) a recording of the video and downloads the recording in WebM format to your computer, for you to view locally.
Playback Displays the playback controls.
Full Screen Displays the camera feed in another tab to view individually.
Create Event If enabled, provides the ability to create an event from the widget.
Note
This option is only available if the provider selected in Select Provider is QVMS Bridge.
Default Domain
The specific default domain to be associated with the created event. It is displayed if Create Event is enabled.
Note
This option is only available if the provider selected in Select Provider is QVMS Bridge.
Default Event Source
The specific default event source to be associated with the created event. It is displayed if Create Event is enabled.
Note
This option is only available if the provider selected in Select Provider is QVMS Bridge.
For QVMS Bridge, if you click on the
 or
or  icons when the popup is displayed and if Create Event has been enabled in the Video panel, a confirmation dialog is displayed for you to choose if you only want to Download the snapshot or recording or Create Event as well with the snapshot or recording.
Note
This confirmation dialog is not displayed if you are in the Settings view.
If Create Event has been selected, the snapshot or recording of the current feed is downloaded as well as the manual New Event panel is displayed with the snapshot or recording attached and with the following properties pre-populated:
Setting
Description
Domain
The Default Domain selected in the Video panel.
Event Source
The Default Event Source selected in the Video panel.
Event Description
The name of the camera.
Criticality
The importance of the event is set as High.
latitude
The latitude of the camera.
longitude
The longitude of the camera.
Select the Event Type and click Create to create the event and it is created and can be seen in Events.
The following settings refer to the display of fields from the dataset in the pop-up window. Ensure that the Information slider is slid to the right so that you can open the panel.
Setting
Description
Operation
Determines whether to simply display a specific value from a dataset column or enter a value.
Value A specific value from the selected column.
User Input A value that you enter.
Title
The text that appears in the title bar of the pop-up window.
You can also translate this text by clicking on the Translate icon
 and entering the translation of the desired language selected. Auto-suggestions are also available where the reused contents are auto-suggested.
Note
It must be 3-15 characters only.
Prefix
Text to display before the popup title.
Note
It must be at most 100 characters only.
Suffix
Text to display after the popup title.
Note
It must be at most 100 characters only.
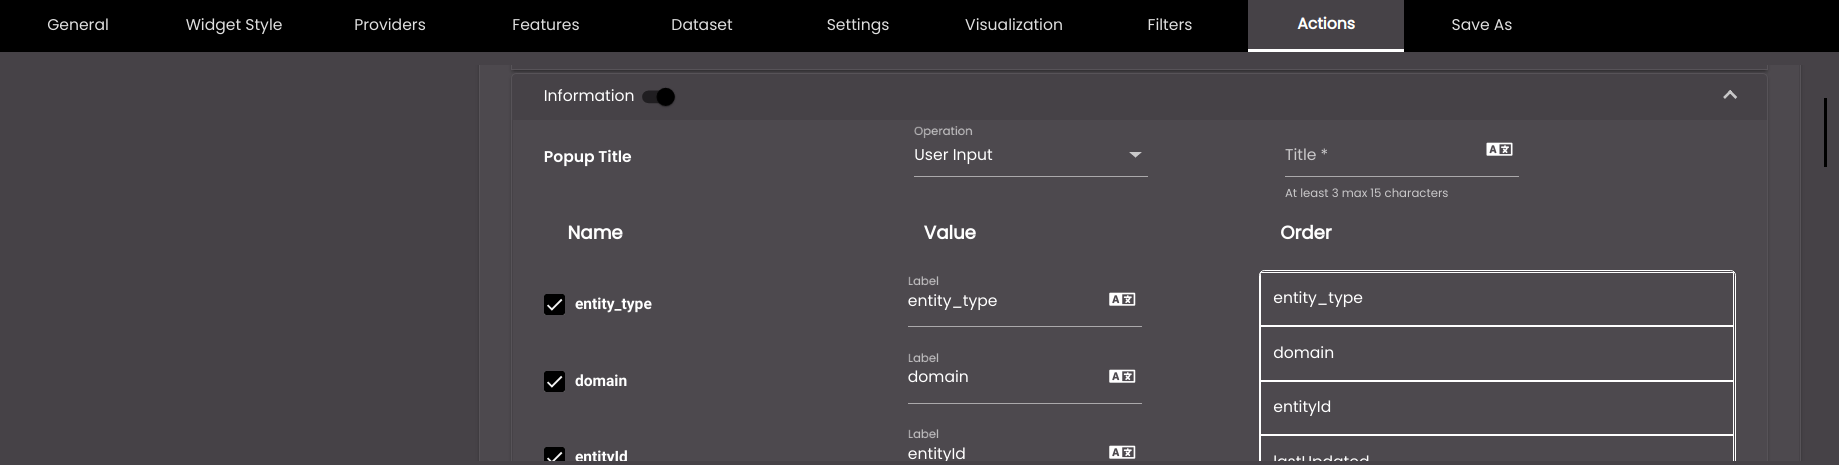
Dataset field check boxes
There is a check box for each field in the dataset. Select each one that you want to display.
Label
The label to use for each dataset field that you want to display.
You can also translate this text by clicking on the Translate icon
and entering the translation of the desired language selected. Auto-suggestions are also available where the reused contents are auto-suggested.Order
The order in which the dataset fields needs to be displayed.
The following settings refer to the actions that can be performed on a remote device at the marker, for example displaying some text on a visual message display in a car park. Any actions that you add are displayed on the Actions tab in the pop-up window. Ensure that the Popup Actions slider is slid to the right so that you can open the settings panel.
Setting
Description
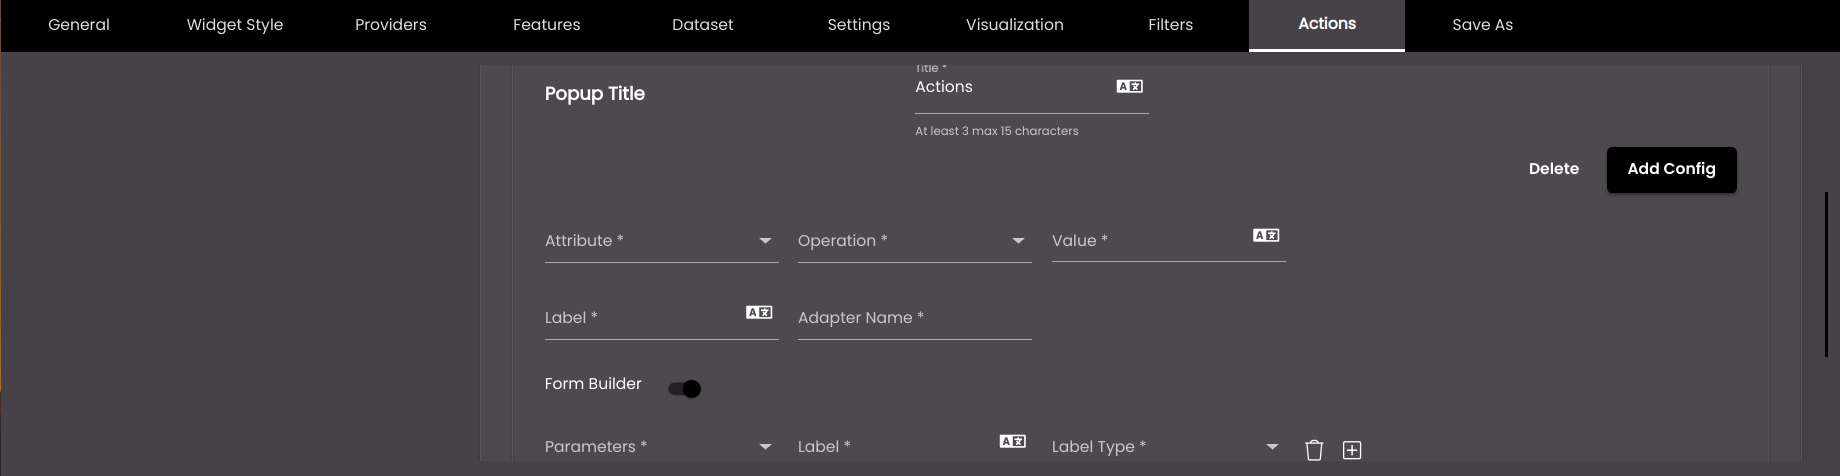
Title
The text that appears in the Actions tab of the pop-up window.
You can also translate this text by clicking on the Translate icon
and entering the translation of the desired language selected. Auto-suggestions are also available where the reused contents are auto-suggested.Note
It must be 3-15 characters only.
Attribute
The property of the dataset.
Operation
The operator to be used to compare the value of the dataset property Attribute field for each marker against the Value field.
Value
The name of the property.
You can also translate this text by clicking on the Translate icon
and entering the translation of the desired language selected. Auto-suggestions are also available where the reused contents are auto-suggested.Label
The label to use for each dataset field that you want to display.
You can also translate this text by clicking on the Translate icon
and entering the translation of the desired language selected. Auto-suggestions are also available where the reused contents are auto-suggested.Adapter Name
The name of the outbound adapter that you want to use.
To add another action, click Add Config.
To delete an action, click Delete
For sending the data to the adapter we build a form with the help of Form Builder. In Form Builder, each form element will be created by mapping against a dataset property with the form element label type. Ensure that the Form Builder slider is slid to the right so that you can open the settings panel.
Setting
Description
Dataset property
The properties in the dataset.
Label
The label to use for each dataset field that you want to display.
You can also translate this text by clicking on the Translate icon
and entering the translation of the desired language selected. Auto-suggestions are also available where the reused contents are auto-suggested.Label Type
The type of the dataset property.
Text
Toggle
Textarea
Slider
To add more form elements, click on the Add Control
 icon.
icon.To delete the form elements, click on the Delete
icon.When you have finished adding pop-up actions, click Save.
You can also perform multi-selection of markers over the Map and trigger an outbound adapter.
Select the Actions tab and under the Popup Actions panel, add a popup action as mentioned above.
Enable the multi-selection of markers by clicking on the Selection icon in the Designer Panel.
Select multiple markers by clicking and dragging to draw a rectangle around the desired markers.
In the Information pop-up window, click on the Actions tab. In the dataset property field, enter the value that needs to be updated for all the selected markers.
Click Update.
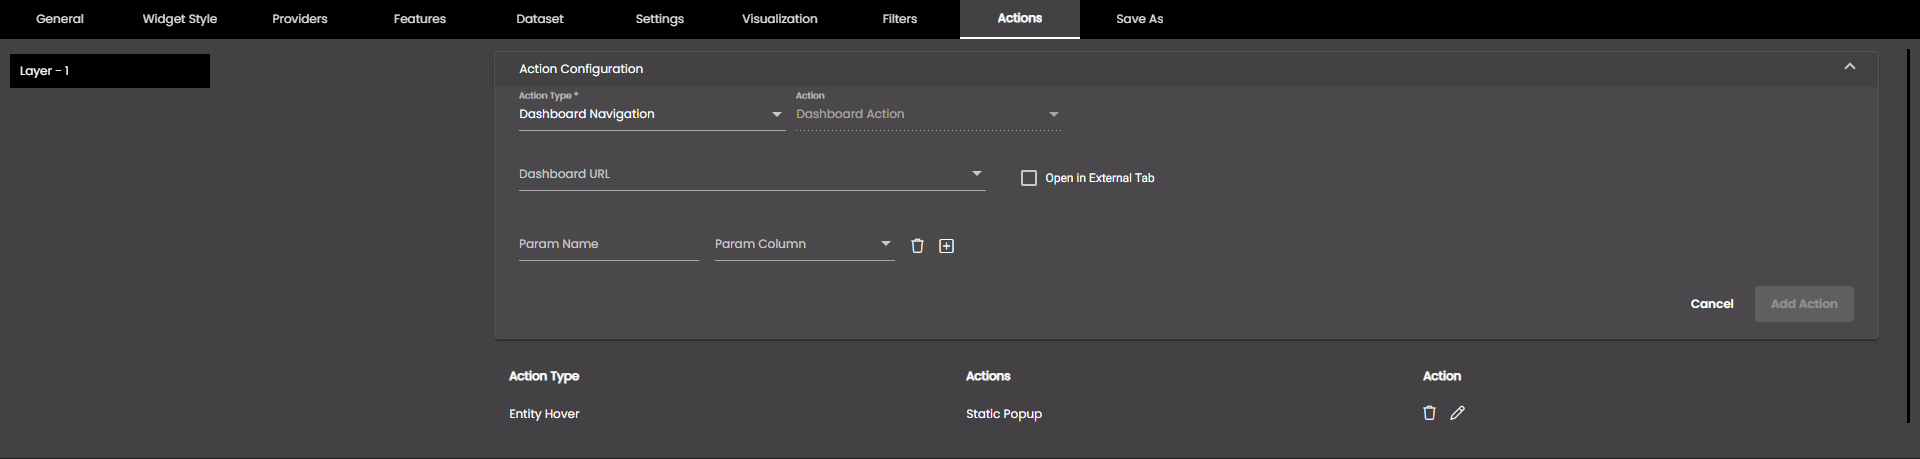
If you select Dashboard Navigation, the following settings are displayed, for you to change as required:
Setting
Description
Dashboard URL
The reference to the dashboard we need to navigate to.
Open in External Tab
If selected, the dashboard is opened in another tab.
Param Name
The name of the filter to be used to narrow down the data in the navigating dashboard. This will be included as a query parameter in the dashboard URL.
Param Column
The column whose value should be used as the filter value to filter the data in the dashboard it navigates to. So, you select the column that contains values that can be assigned to this parameter.
To add further parameters, click +.
If you have edited an existing action, at the bottom of the Action Configuration drop-down panel, click Update Action.
If you have added a new action, click Add Action.
The action is updated in, or added to, the table below the Action Configuration drop-down panel.
On the left-hand side of the tab, click any other layer for which you want to configure actions and change the settings as required.