Create a region
In the top left-hand corner of the main dashboard screen, click the Admin Panel icon:
 .
.On the Admin Panel, click Definitions
 .
.If it is a new tenant and no regions have been created yet, on the right-hand side of the map on the Regions screen, click the Create Root Region.
Select which method to use to create the root region:
Draw Polygon Draw a polygon on the map by clicking each point, then clicking the first point again to close the polygon.
Enter Bounding Box Enter a comma-separated list of alternate latitude and longitude coordinates to define the bounding polygon for the region.
Enter the root region name.
Note
It must be 2-30 characters only.
Click Create.
The root region will be created.
On the right-hand side of the root region name, click on the New Region Group icon:
 .
.Note
All the existing regions that were created earlier have been grouped under the region group Default Region Group.
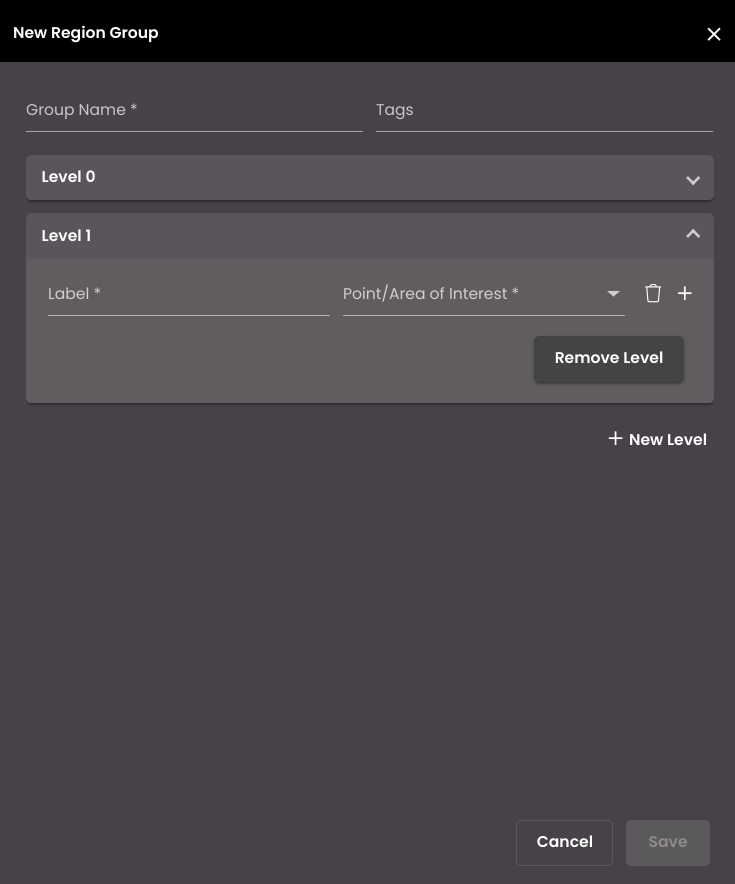
Enter a Group Name for the region group. This is the name that will be shown in the list of region groups.
Enter one or more descriptive tags for the region group. Hit Enter on the keyboard after typing the tag descriptor to add it to the list.
Enter a Label for the first level Level 0 in the region group. By default, the Point/Area of Interest will be selected as Polygon.
Click New Level to add another region group level.
Note
You can add at most seven region group levels for a region group.
For each level, enter the Label and select a Point/Area of Interest among Point, Line or Polygon to create a feature. You can click on the Delete Feature icon
 to delete the corresponding feature in a region group level. Likewise, you can add another feature in a region group level by clicking on the Add New Feature icon: . If you need to delete the entire region group level, click on the Remove Level button.
Press the Save button at the bottom of the panel to save the region group.
The created region group will be displayed in the list and if you click it, it will be displayed on the map. If you hover over the region group in the list, you can see the view, edit, delete and create icons. Click the  icon to toggle between the region group being visible or not on the map. Click the
  icon to edit the region group configuration. Click the
  icon to delete the region group and the icon to create the polygon coordinates for Level 0 in the region.
Warning
If you delete a region group, there will be an impact on the events that are generated for that region group.
Click create and select either Draw Polygon or Enter Bounding Box and configure it to create a region.
Note
You can edit a region group only if it doesn't have any features(levels) created in it.
If you hover over the region in the list, you can see the view, edit, delete and create icons. Click the icon to toggle between the region being visible or not on the map. Click the icon to edit the region configuration. Click the icon to delete the region and the icon to create the polygon coordinates for the feature(s) in the region level.
Warning
If you delete a region, there will be an impact on the events that are generated for that region.
Click create and based on the features you created for each level, their corresponding Point/Area of Interest options will be displayed which you can accordingly configure. Select either Draw Polygon or Enter Bounding Box and configure it to create a feature in the region.
Refresh Button: If you are in another region and want to go back to the root region then you can click on the Refresh icon  on the right-hand side of the root region name.
Zoom in: You can double click on a region to zoom in instead of zooming in manually.