Configure dashboard filters
In the top left-hand corner of the main screen, click the Dashboards menu icon.
Click Dashboard Settings at the bottom of the panel.
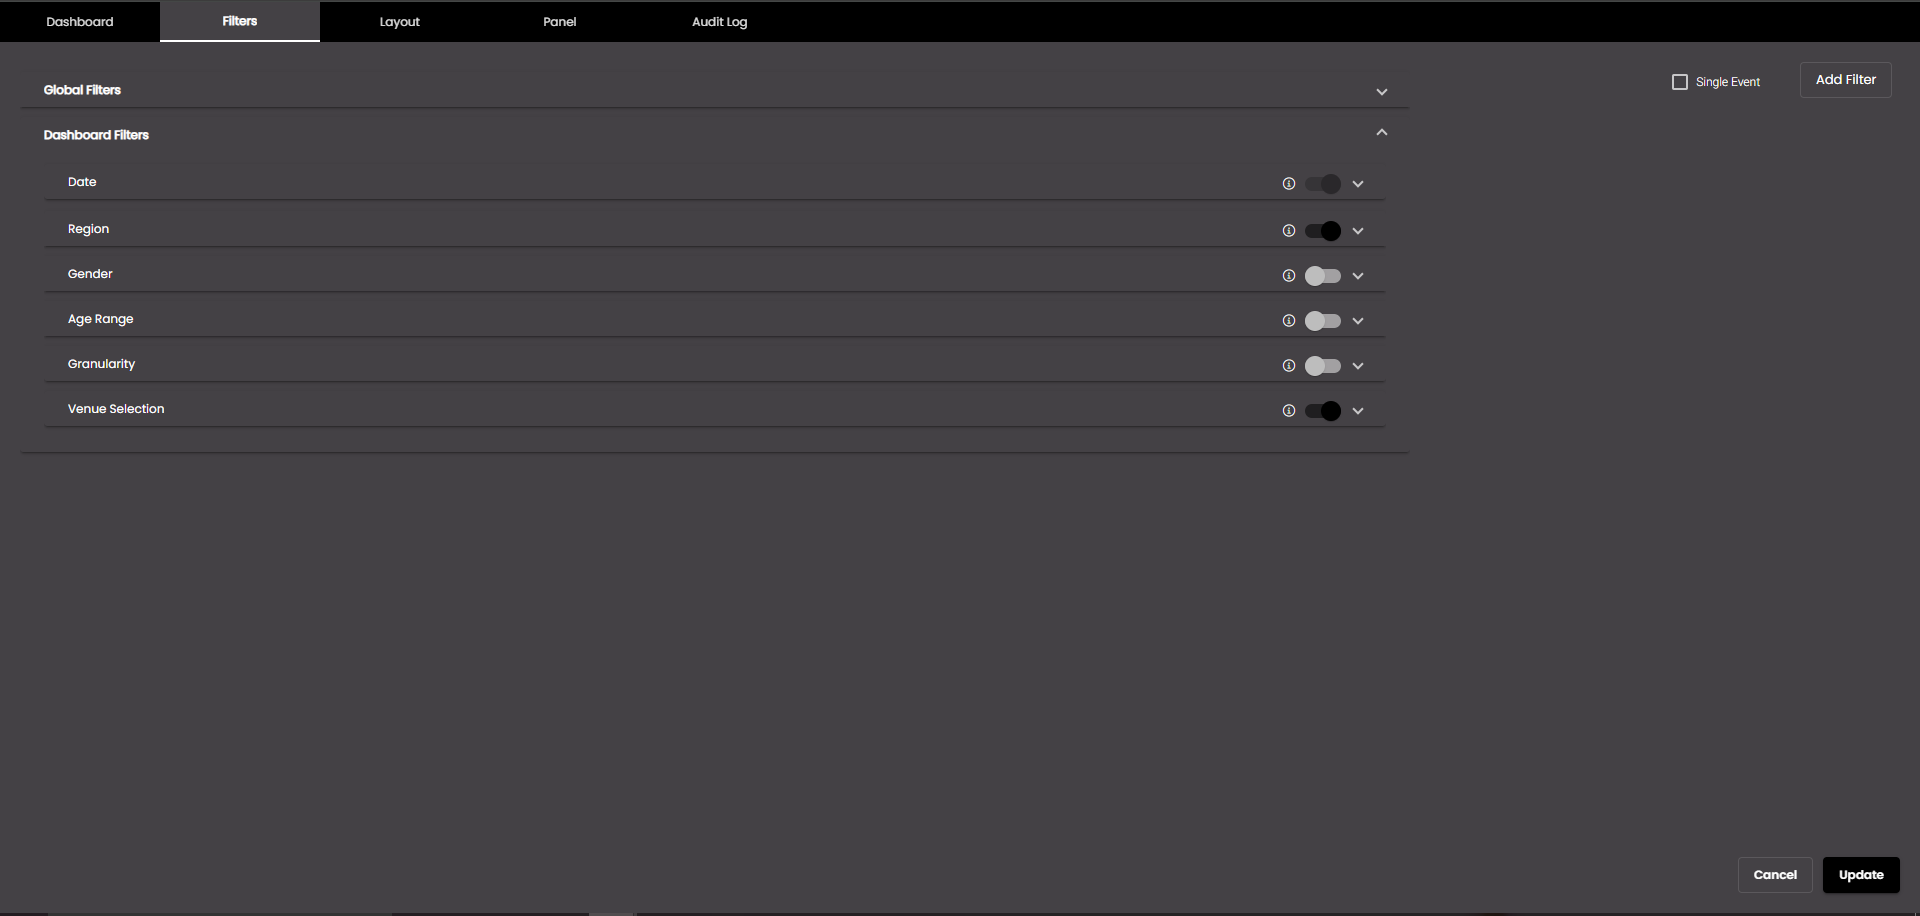
In the dialog box that is displayed, click the Filters tab.
Change the settings as required:
Global Filters
If any filters are configured and enabled in Admin Panel > Appearance > Advanced > Global Filters, they are displayed here. They can be accordingly enabled to filter all the dashboards. For more information, see Configure global filters.
Once enabled, the dashboard is updated so that it displays only information that is relevant to that global filter. Also, the selected global filter is displayed as a 'chip' on the right-hand side of the dashboard:

The click on a filter chip enables the user to modify the respective filter. It opens the filter pop-up and expands the respective filter for any modifications.
A Filter button is located in the top right corner of the dashboard, allowing users to modify or reset the applied filters. Press the Apply button to apply this filter. To reset the filters back to their default state, click on Reset All in the filters panel.
Also, to clear the selected global filter you can click on the
 icon in the chip on the dashboard or Filters panel.
Dashboard Filters
Setting
Description
Date
Displays the Default Date and to select a specific date, date range or month-year for which the current dashboard should display information. For more information, see Filter dashboard on time period.
Region
Displays the list of regions and to select a specific region for which the current dashboard should display information. For more information, see Filter dashboard on region.
Gender
Displays the list of genders and to select a specific gender for which the current dashboard should display information. For more information, see Filter dashboard on gender.
Age Range
Displays a age range slider and to select a specific age range for which the current dashboard should display information. For more information, see Filter dashboard on age range.
Granularity
Displays the list of granularities and to select a specific granularity for which the current dashboard should display information. For more information, see Filter dashboard on granularity.
Also, to generate a single event for all the filters that are enabled, select Single Event and select the desired event from the Event drop-down.
To add a custom filter, click the Add Filter button.
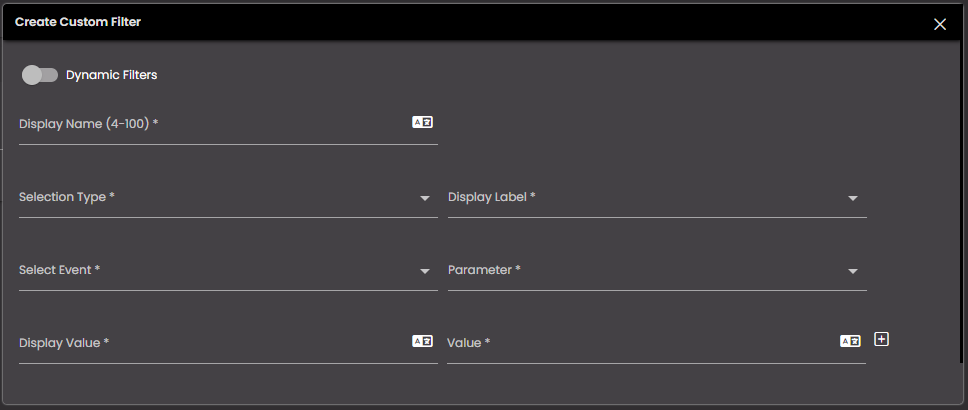
In the Create Custom Filter dialog, configure the following settings:
Setting
Description
Dynamic Filters
If enabled, the filters can be configured to get the values from the dataset. Otherwise, the filters will be created with static data.
Multi-level (only when Dynamic Filters are enabled.
If enabled, multiple levels of filters can be configured. For example, a filter can be created with 'Population' and 'Year' columns data to show the population of the cities in a state for a particular year.
Display Name
The name of the custom filter.
You can also translate this text by clicking on the Translate icon
 and entering the translation of the desired language selected. Auto-suggestions are also available where the reused contents are auto-suggested.
Note
It must be 4-100 characters long only.
Data Source (only when Dynamic Filters are enabled.
The dataset to be used to create a new filter.
Data Column (only when Dynamic Filters are enabled.
The dataset column data which should be used to filter.
Selection Type
The type of selection of the filter which can be either Single Selection or Multiple Selection.
Display Label
The label or value to be displayed. It is currently not used.
Select Event
The event on which the widget information is updated. The default events are as follows:
MAP_ENTITY_CLICK The user clicks a marker on a map widget.
DASHBOARD.REGION_CHANGE_EVENT The user selects a different Region from the Region filter.
DASHBOARD.DATE_RANGE_CHANGE_EVENT The user selects a different time period from the Date filter.
TABLE.SELECT_ROW_EVENT The user selects a row in a datagrid widget.
DASHBOARD.LANG_CHANGE_EVENT The user selects a different language from the Language drop-down at the top of the main screen.
DASHBOARD.GENDER_CHANGE_EVENT The user selects a different gender from the Gender filter.
DASHBOARD.AGE_RANGE_CHANGE_EVENT The user selects a different age range from the Age Range filter.
DASHBOARD.GRANULARITY_CHANGE_EVENT The user selects a different granularity from the Granularity filter.
Parameter
The parameter value that is passed when an event occurs. Select the parameter that you want to pass.
Display Value (only when Dynamic Filters are disabled.
The item that is to be displayed in the custom filter.
You can also translate this text by clicking on the Translate icon
and entering the translation of the desired language selected. Auto-suggestions are also available where the reused contents are auto-suggested.Value (only when Dynamic Filters are disabled.
The value of the item displayed in the custom filter.
You can also translate this text by clicking on the Translate icon
and entering the translation of the desired language selected. Auto-suggestions are also available where the reused contents are auto-suggested.
Adds another Display Value and Value.

Deletes a Display Value and Value.
Click Create.
Once the custom filter is created, you can edit it by clicking the Edit Custom Filter icon:
 and delete it by clicking the Delete Custom Filter icon:
  in the custom filter drop-down.
Click Update.
The dashboard is updated so that it displays only information that is relevant to that custom filter. Also, the selected custom filter is displayed as a 'chip' on the top-right hand side, before the Filter button on the dashboard:
The click on a filter chip enables the user to modify the respective filter. It opens the filter pop-up and expands the respective filter for any modifications. If the filter values are more than 5, it is displayed as a dropdown and you can also search for the desired filter value in it.
A Filter button is located in the top right corner of the dashboard, allowing users to modify or reset the applied filters. Press the Apply button to apply this filter. To reset the filters back to their default state, click on Reset All in the filters panel.
Also, to clear the selected custom filter you can click on the
icon in the chip on the dashboard or Filters panel.
Note
To enable a widget to display information that changes dependent on the custom filter selection, you must also select the same Select Event event in the list of Refresh Events in that widget's configuration.
Additionally, a Default value can be selected for each of the filters enabled in the Filters tab.