Filter dashboard on age range
You can filter the information that is displayed on a dashboard so that it displays information only for a particular age range.
In the top left-hand corner of the main screen, click the Dashboards menu icon.
Click Dashboard Settings at the bottom of the panel.
In the dialog box that is displayed, click the Filters tab.
Enable the Age Range filter.
Note
If disabled, it doesn't display the age range filter on the dashboard header bar. Hence, you will not be able to select a particular age range for which the current dashboard displays information.
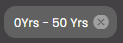
Click the Age Range drop-down list which shows a slider to select the age range:

Select the age range which should be set as a default one for the current dashboard.
Click Update.
The dashboard is updated so that it displays only information that is relevant to that age range. Also, the selected age range is displayed as a 'chip' on the right-hand side of the dashboard:
If you click on the chip, it will open the Age Range filter drop-down from which an age range can be selected.
A Filter Preview button is also present, next to the chip, which on clicking displays the Age Range filter drop-down from which an age range can be selected. Press the Apply button to apply this filter. To reset the filter, click on Clear All in the filters panel.
Also, to clear the selected age range you can click on the
 icon in the chip on the dashboard or Filters panel.
Note
To enable a widget to display information that changes dependent on the Age Range selection, you must also select DASHBOARD.AGE_RANGE_CHANGE_EVENT in the list of Refresh Events in that widget's configuration.