Create a connector
In the top left-hand corner of the main dashboard screen, click the Manage icon:
 .
.On the Manage panel, click Data Pipeline
 .
.In the Connectors screen, click the Connector icon:
 .
.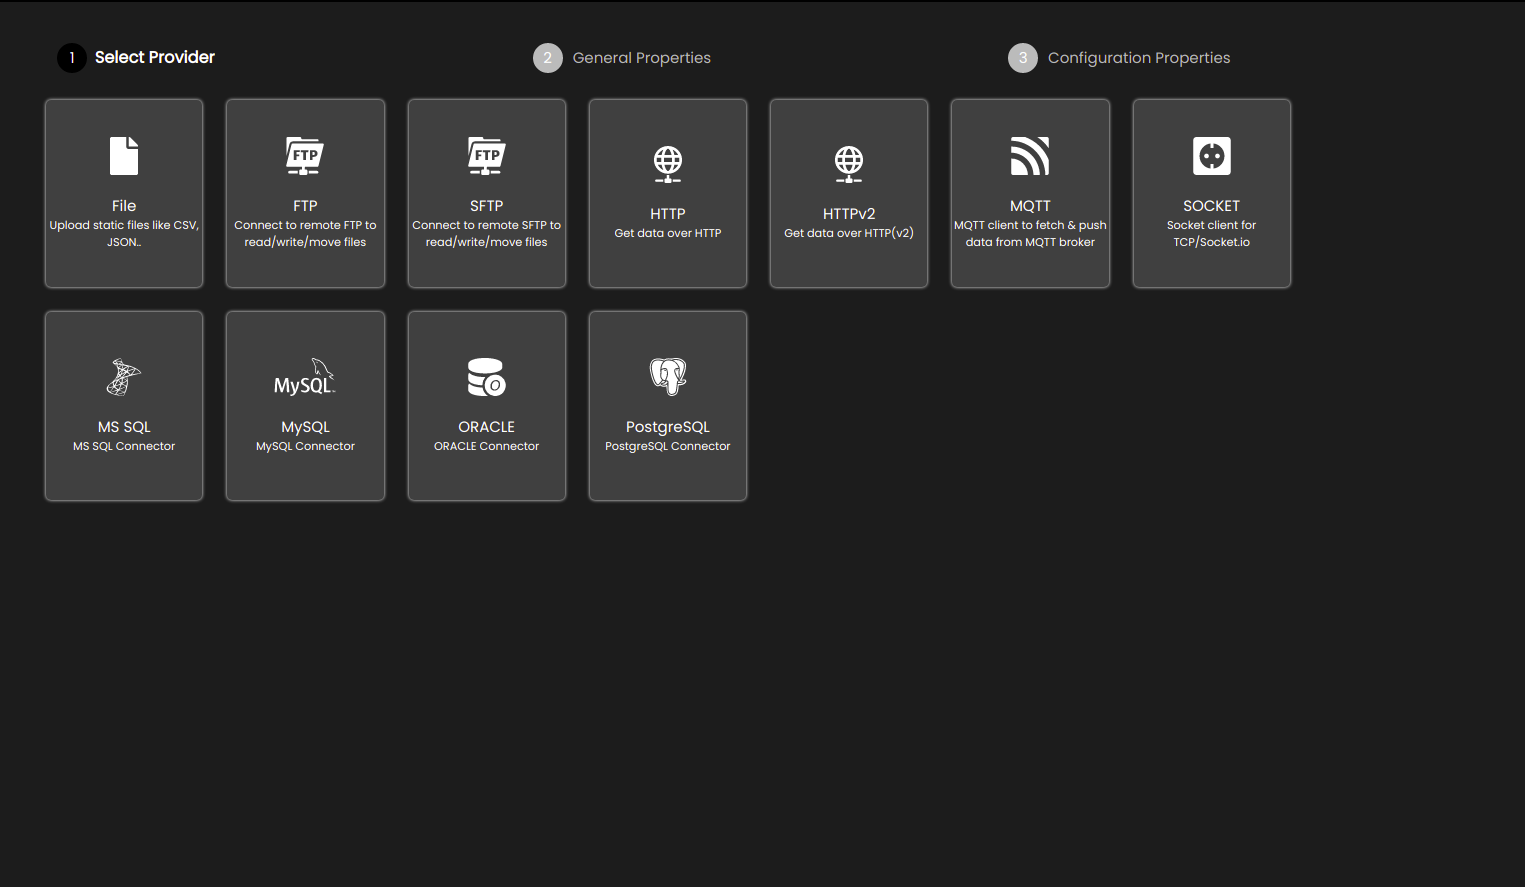
Select the connector type from one of the following:
HTTP - A REST interface or other HTTP-based integration.
HTTPV2 - A REST interface or other HTTP-based integration that provides the option to enter or import cURL commands and execute them.
FILE - A file.
SOCKET - A TCP sockets interface.
MQTT - Connect to an MQTT (Message Queuing Telemetry Transport) broker.
FTP - A client/server protocol used for transferring files to or exchanging files with a host computer.
SFTP - A secure FTP (File Transfer Protocol) used for transferring files to or exchanging files with a host computer.
MS SQL - A Microsoft SQL Server relational database.
MySQL - An open-source relational database.
Oracle - An Oracle relational database.
PostgreSQL - An open-source object-relational database.
Enter the connector Name. This is a descriptive name that appears in the list of connectors. It must be 3-30 characters only.
Depending on the connector type, select the connection template that this connector is to be based on from the list of Available Connection Templates, then click Next to complete the configuration.

Depending on the data source type, edit the corresponding configuration details in the panel as indicated below.
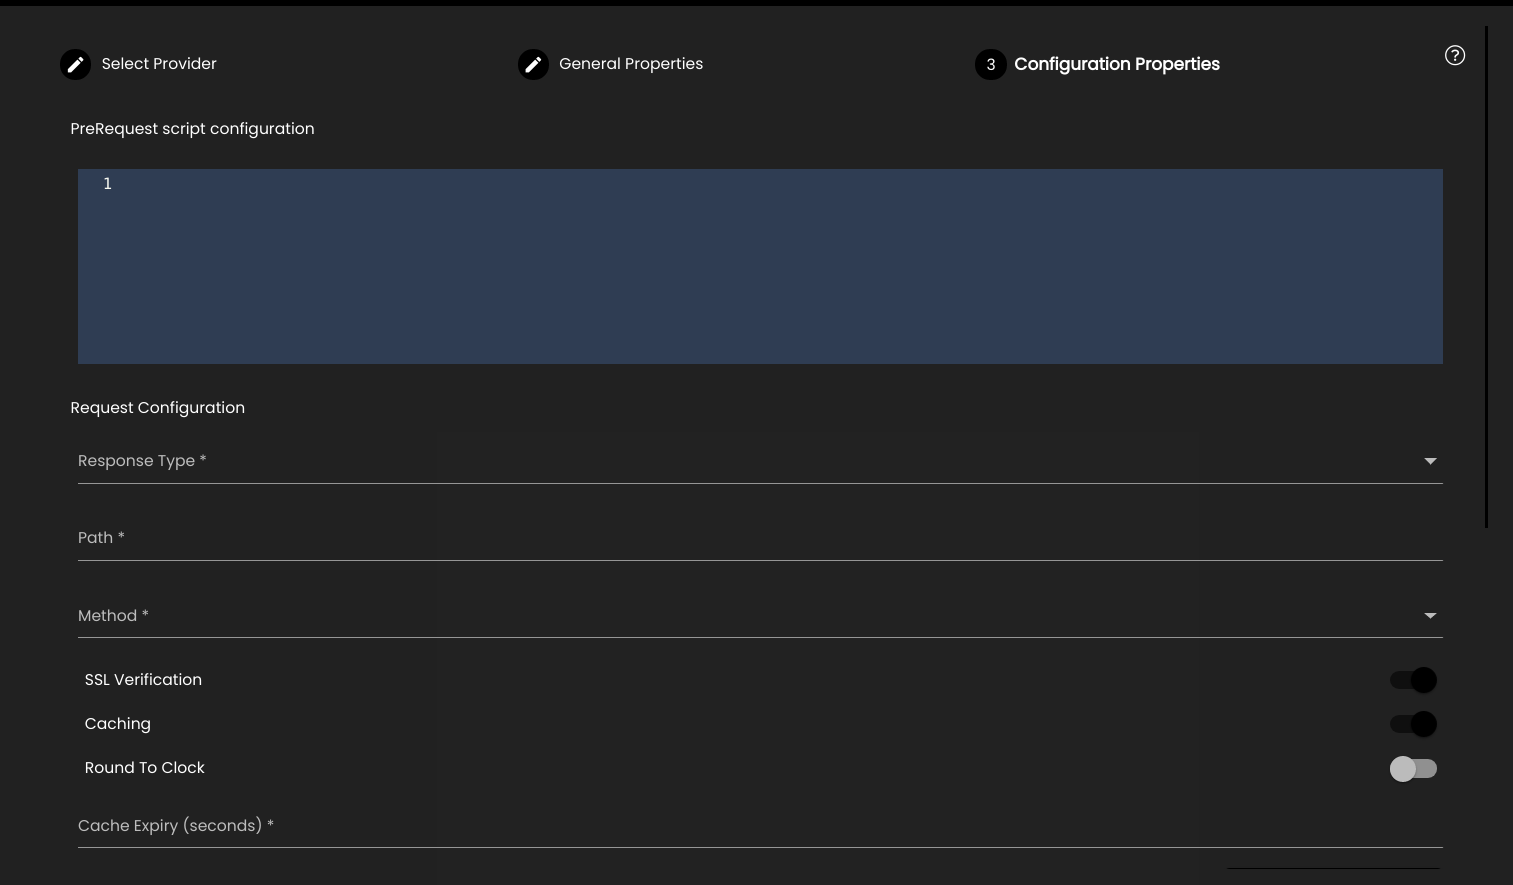
For a HTTP connector, provide the following configuration details:
Setting
Description
Pre-request Script Configuration
An optional JavaScript that is executed before the request is submitted.
Response Type
Select how the response data will be formatted. This can be one of the following:
JSON
CSV
XML
Text
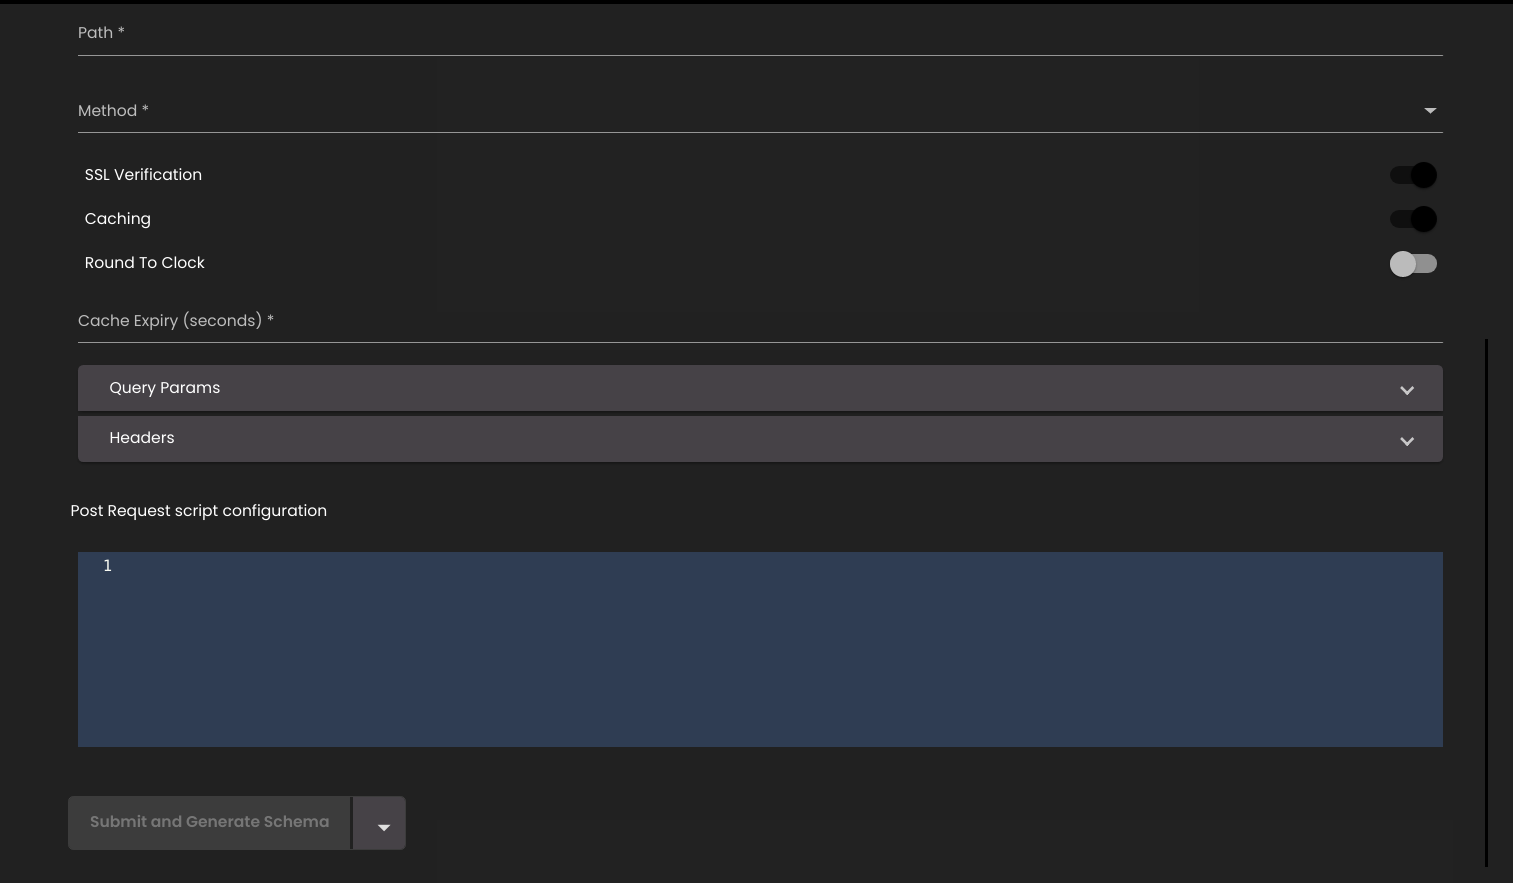
Path
The right-hand side of the URL that is to be appended to the base URL in the corresponding connection template.
The path may optionally include parameters which would be exposed as additional inputs in the connector. For example, the path below creates two additional input parameters inputProp and envProp which is used by the connector to retrieve data for a specific device and a specific sensor-type:
/api.php?action=device-data&device-id={{inputProp:string}}&sensor-type={{envProp:string}}Method
The HTTP method to be used for the request. This can be one of the following:
GET
POST
PUT
Query Params
One or more key–value pairs for HTTP request param.
Headers
One or more key–value pairs for HTTP request headers.
Body
This option allows you to enter static data that can be sent in the body of the HTML request. You can select one of the following for the Payload Type:
None
form-data
x-www-form-urlencoded
raw
SSL Verification
Select whether or not to bypass the process of ensuring the certificate the site holds is valid and identifying it correctly. Enabled by default. If it is enabled then the verification of the SSL certificate is done.
Caching
Select whether or not to cache the data for reusability across datasets.
Cache Expiry (seconds)
The expiry time (in seconds) of the cached data. It is displayed if Caching is enabled.
Round To Clock
Select whether or not to reduce the ingestion time and the data mismatch between different dashboards and databases. It is displayed if Caching is enabled.
Round To Clock Options
The time of reducing the ingestion and data mismatch. It is displayed if Round To Clock is enabled.
Enable Streams
Select whether or not the data can be sent in streams. If this option is selected then the data is sent in blocks as it is received so that the data can be processed a record at a time. If the data is formatted as CSV then it is sent one record at a time; if it is in JSON format then it is sent one object at a time. The dataset can either process each record/object individually and pass it on to the consumer, or it can accumulate all of the fragments and construct a complete CSV file or JSON structure before passing this on to the consumer.
Attribute List
An attribute list used to define the start and end of JSON objects to be streamed. For example, the following list indicates that individual objects whose first attribute is
deviceIdand last attribute issiteInfoshould be streamed:{deviceID siteInfo}.Post-request Script Configuration
An optional JavaScript that is executed after the request has been submitted.
For a MS SQL , MySQL, Oracle or PostgreSQL connector, provide the following configuration details Configuration Properties:
Setting
Description
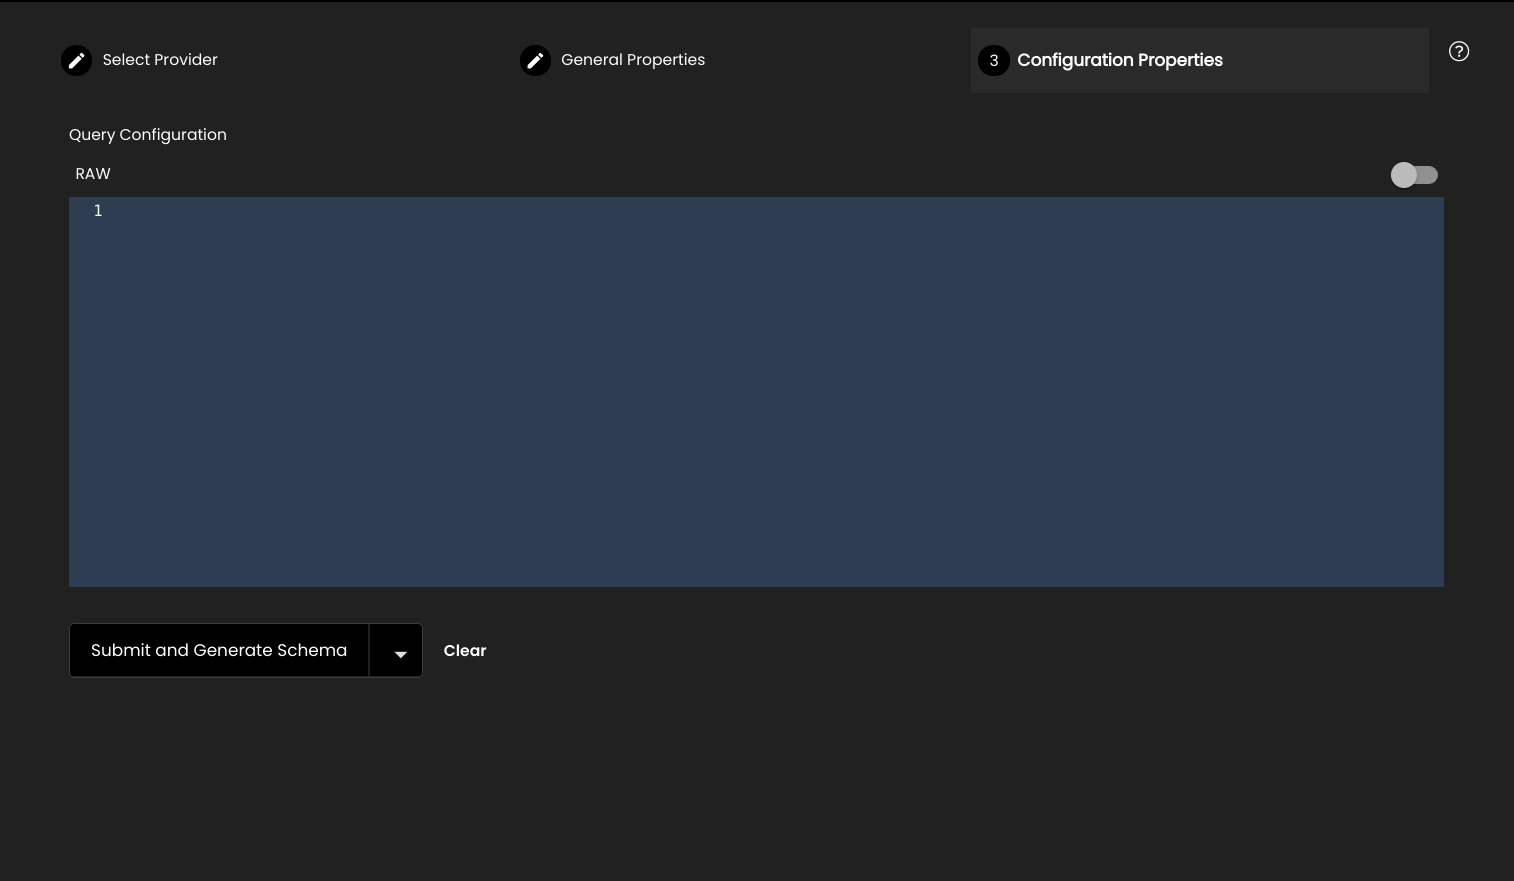
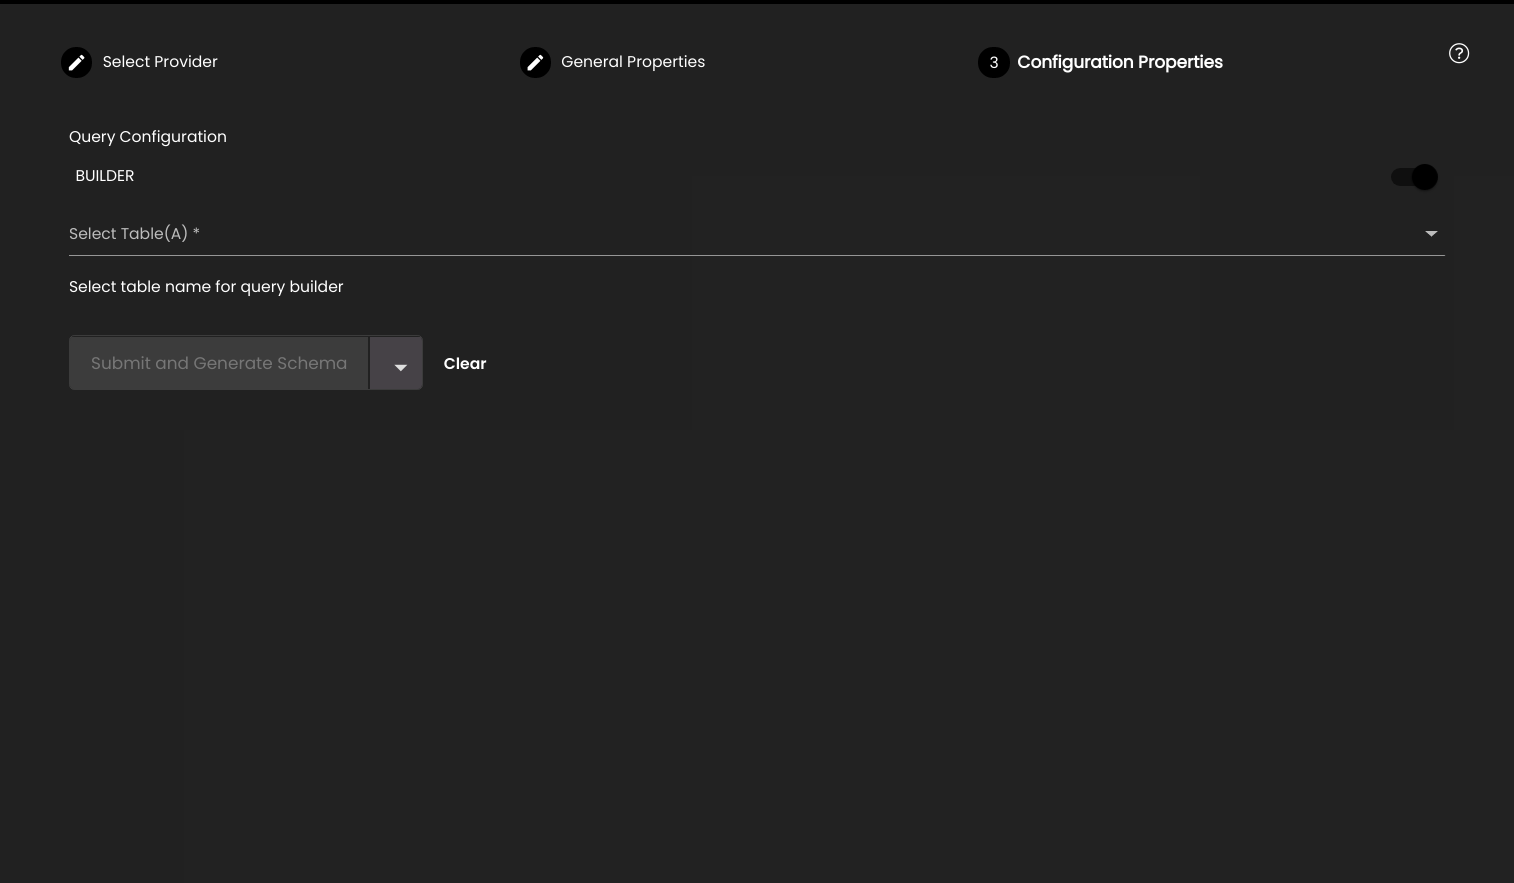
Query configuration
This can be one of the following:
BUILDER – use an interactive query builder to construct the database query, selecting the table having an alias as 'A', adding joins like innerjoin, outerjoin, leftjoin or rightjoin with a second table having an alias as 'B', selecting the columns, group/distinct/order-by clauses and filter criteria.
RAW - enter a raw SQL query.
For a File connector, provide the following configuration details:
Setting
Description
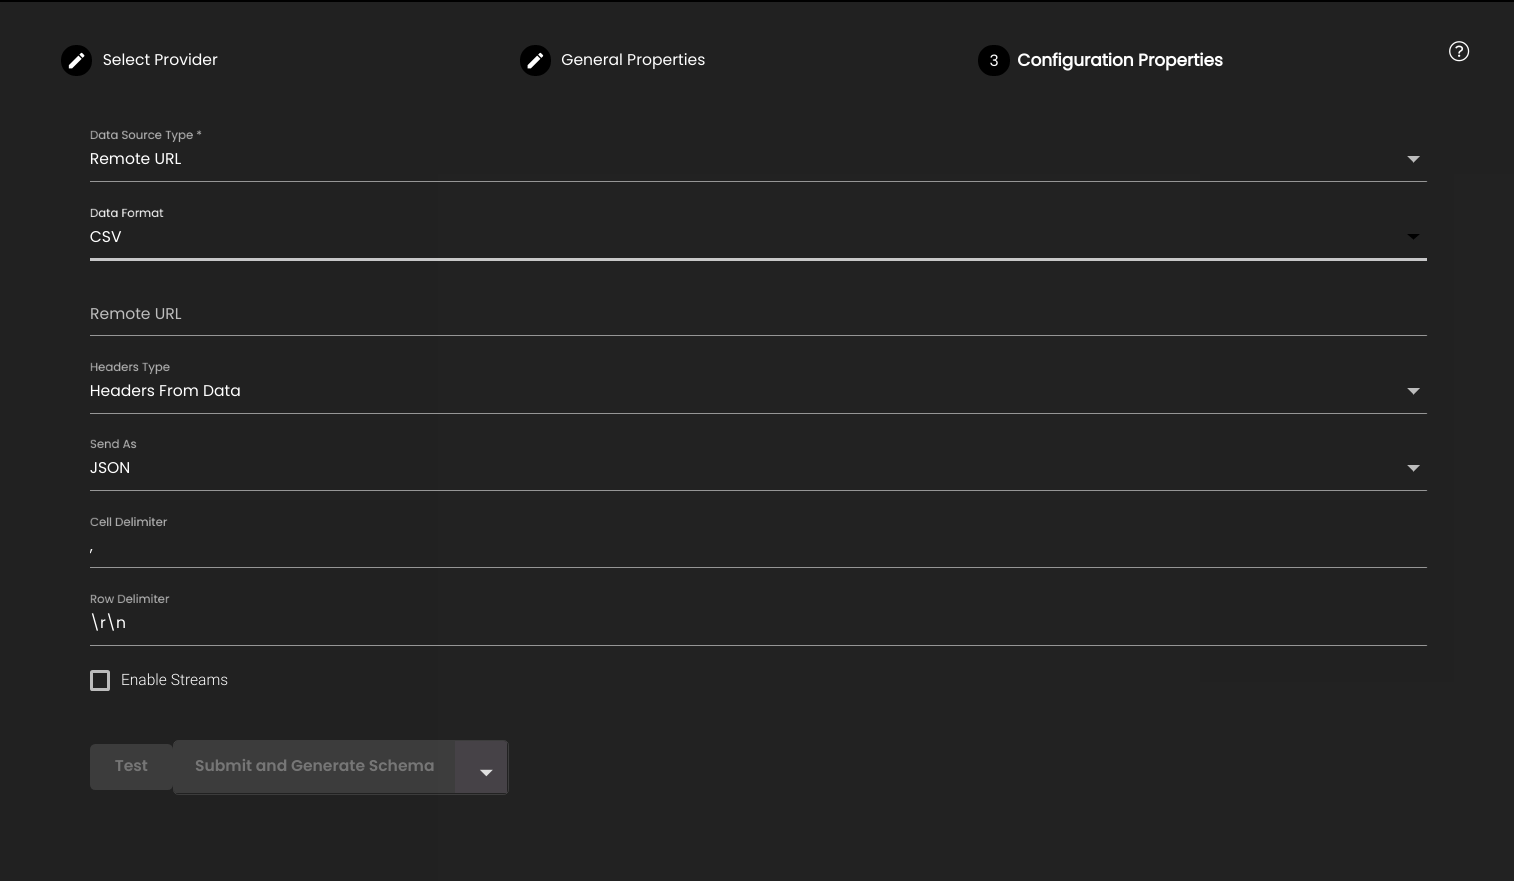
Data Source Type
Select one of the following:
Remote URL - load data from a remote file that is accessible on the network.
File Upload - load data from files on the local device.
Note
Uploading GeoJSON, TopoJSON or TSV files are currently supported only on the Windows OS.
Local Data - enter static data directly into the configuration panel.
Note
The static data entered in the clipboard must not exceed 500 KB.
Remote URL
Specify the URL for the remote file. Only required when data source type is Remote URL.
Data format
Select one of the following data formats:
CSV - tabular data.
GeoJSON - geographical data.
JSON - JSON formatted data.
This setting is only required when the data source type is Remote URL or Local Data.
Send As
Select one of the following data formats:
RAW - the data is stored without any structure.
JSON - the data is assumed to be in JSON format.
This setting is only required when the data source type is Remote URL or Local Data.
Headers Type
Select one of the following:
Headers from Data - the first row of data contains the column headers.
Auto Generate Headers - there is no header information provided, so automatically create column headers.
This setting is only required when the data source type is Remote URL or Local Data.
Streams
Select whether or not the data can be sent in streams. If this option is selected then the data is sent in blocks as it is received so that the data can be processed a record at a time. If the data is formatted as CSV then it is sent one record at a time; if it is in JSON format then it will be sent one object at a time. The dataset can either process each record/object individually and pass it on to the consumer, or it can accumulate all of the fragments and construct a complete CSV file or JSON structure before passing this on to the consumer.
For a Socket connector, provide the following configuration details:
Setting
Description
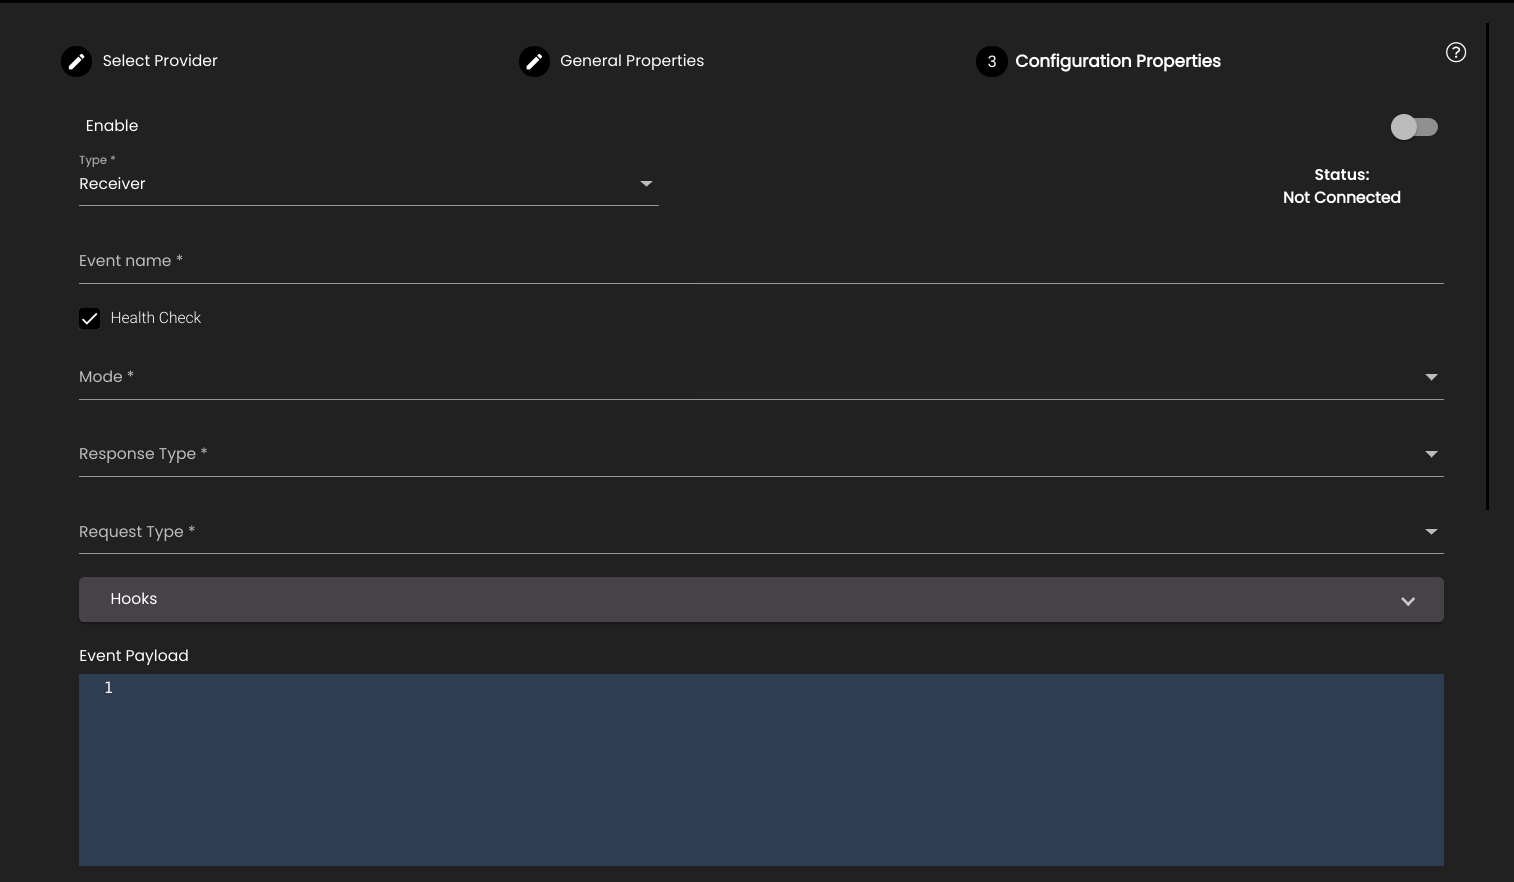
Type
Select one of the following:
On Demand - the connection is closed once the task is completed.
Receiver - the connection is never closed and it keeps on listening to the events.
Enable
Select whether or not we need to connect or disconnect to a socket. If it is enabled, it takes a minute to connect to the socket.
Status
Displays the status of the socket connector whether Connected or Not connected.
Event name
Name of the channel in which the data is passed.
Health Check
Informing that we are in the connected state. If enabled, the Mode drop-down is displayed with contains the following options:
onPeriodicInterval - Informing that we are connected at regular intervals of time.
onCustomMessage - Informing that we are connected on receiving a particular kind of message.
none - No health check is done.
Response Type
Select how the response data can be formatted. This can be one of the following:
JSON
String
Text
Request Type
Select how the request data can be formatted. This can be one of the following:
JSON
String
Hexa
Hooks
The scripts executed during the life cycle operations of a socket connector. The options are as follows:
beforeSend
afterData
You can add a script by clicking on the
 icon and remove an added script by clicking on the
  icon.
icon.Event Payload
The payload data to be sent to the socket server.
Options
Any server-specific connection options.
Sample Data
The dummy data which is used to generate the schema to create the connector initially. It does not remain in the DB.
Also, the ability has been provided to exponentially retry the connection to a Socket connector, in case the connection fails, by a factor of 2 mins with a maximum of up to 16 retries. Once the retry is successful, the retry counter gets reset.
For an MQTT connector, provide the following configuration details:
Setting
Description
Subscriber
The MQTT connector is just going to listen and won’t publish any messages. It is always enabled.
Type
Select one of the following:
On Demand - the connection is closed once the task is completed.
Receiver - the connection is never closed and it keeps on listening to the events.
Enable
Select whether or not we need to connect or disconnect to a MQTT. If it is enabled, it takes a minute to connect to the MQTT.
Status
Displays the status of the MQTT connector whether Connected or Not connected.
Subscriber Topic Name
The name of the topic to which it needs to listen to.
Response Type
Select how the response data can be formatted. This can be one of the following:
JSON
String
Text
Request Type
Select how the request data can be formatted. This can be one of the following:
JSON
String
Hexa
Hooks
The scripts executed during the life cycle operations of a MQTT connector. The options are as follows:
beforeSend
afterSend
You can add a script by clicking on the
icon and remove an added script by clicking on the icon.Options
Any server-specific connection options.
Sample Data
The dummy data which is used to generate the schema to create the connector initially. It does not remain in the DB.
For a FTP or SFTP connector, provide the following configuration details for the read and write operation types:
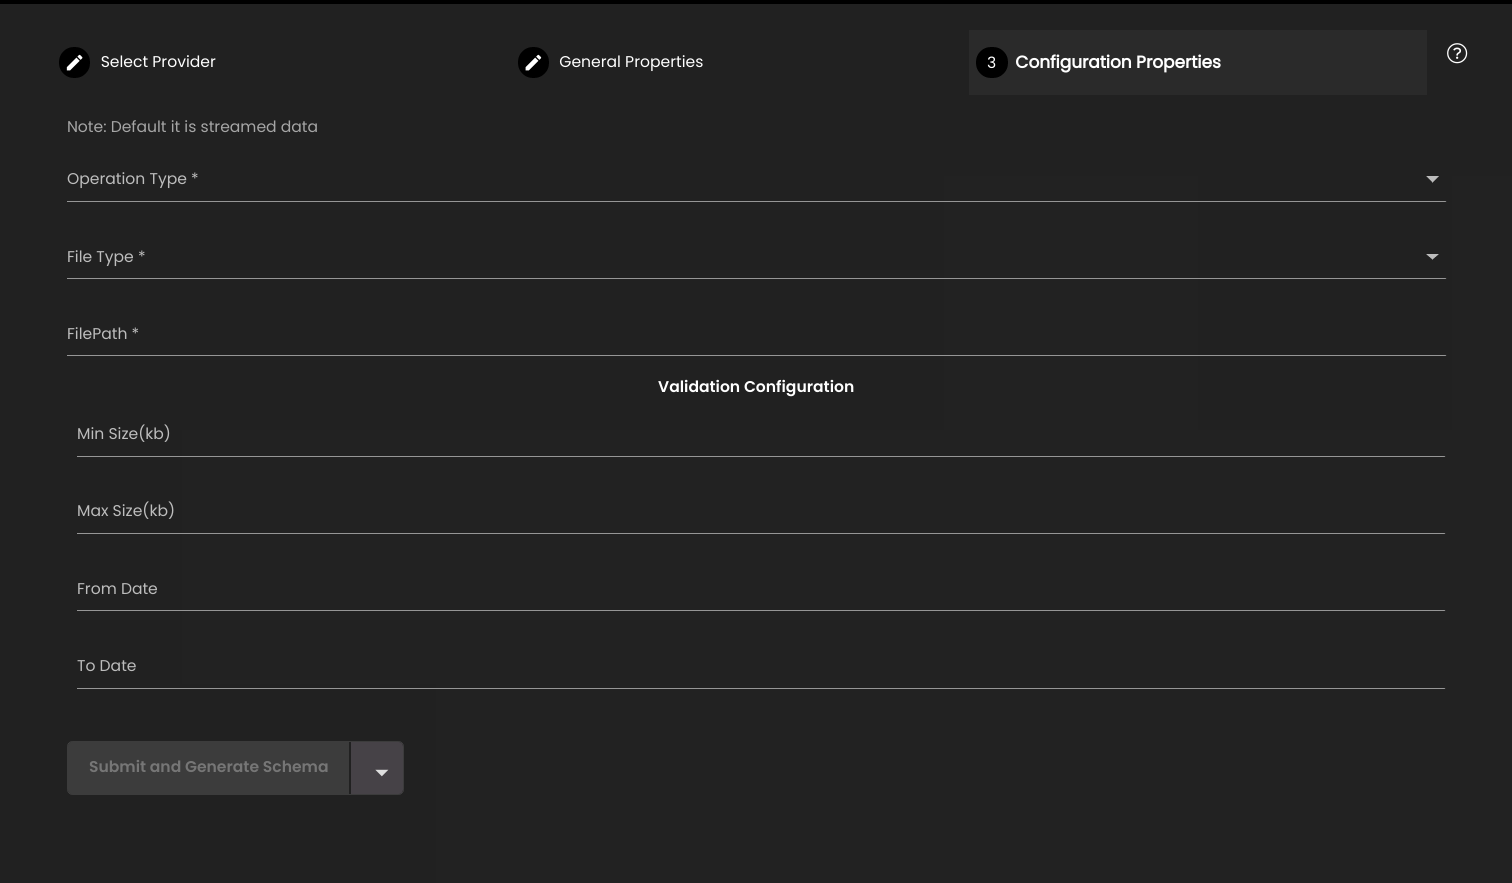
Setting
Description
Operation Type
Type of operation that needs to be performed on the file. Currently Read, Write and Move operations are supported.
File Type
Select the type of file. This can be one of the following:
JSON
CSV
Text
XML
FilePath
Path of the file.
Attribute List
An attribute list used to define the start and end of JSON objects to be streamed. For example, the following list indicates that individual objects whose first attribute is
deviceIdand last attribute issiteInfoshould be streamed:{deviceID siteInfo}.Min Size(kb)
Minimum size of the file (in kb).
Max Size(kb)
Maximum size of the file (in kb).
From Date
Last updated date from which the file needs to be checked.
To Date
Last updated date till which the file needs to be checked.
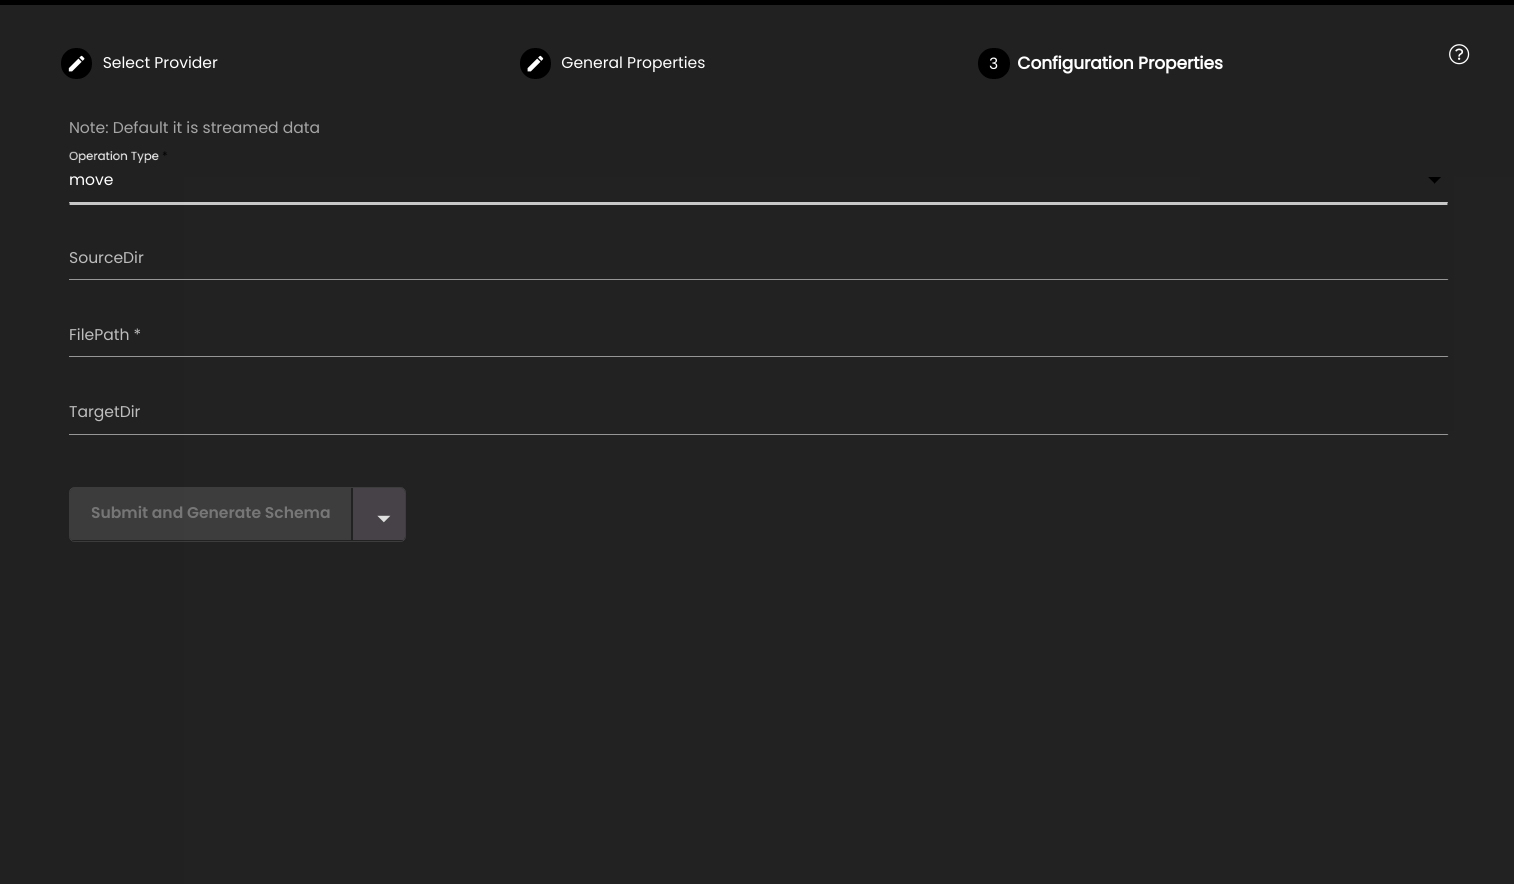
Provide the following configuration details for the move operation type of a FTP or SFTP connector:
Setting
Description
SourceDir
Source directory of the file.
FilePath
Path of the file.
TargetDir
Target directory of the file.
For a HTTPV2 connector, provide the following configuration details:
Setting
Description
Enter Request URL
The remote URL for the HTTP request.
Request methods
The HTTP method to be used for the request. This can be one of the following:
GET
POST
PUT
Parameters
One or more key–value pairs for HTTP request param. Send path and query parameters with your requests using the URL field and the Parameters tab. You can use the Bulk Edit option if you prefer to enter your parameters in text instead of using the UI.
Headers
One or more key–value pairs for HTTP request headers. You can use the Bulk Edit option if you prefer to enter your headers in text instead of using the UI.
Body
This option allows you to enter static data that can be sent in the body of the HTML request. You can select one of the following:
none
form-data
x-www-url-form-urlencoded
raw
Pre Script
An optional JavaScript that is executed before the request is submitted.
Post Script
An optional JavaScript that is executed after the request has been submitted.
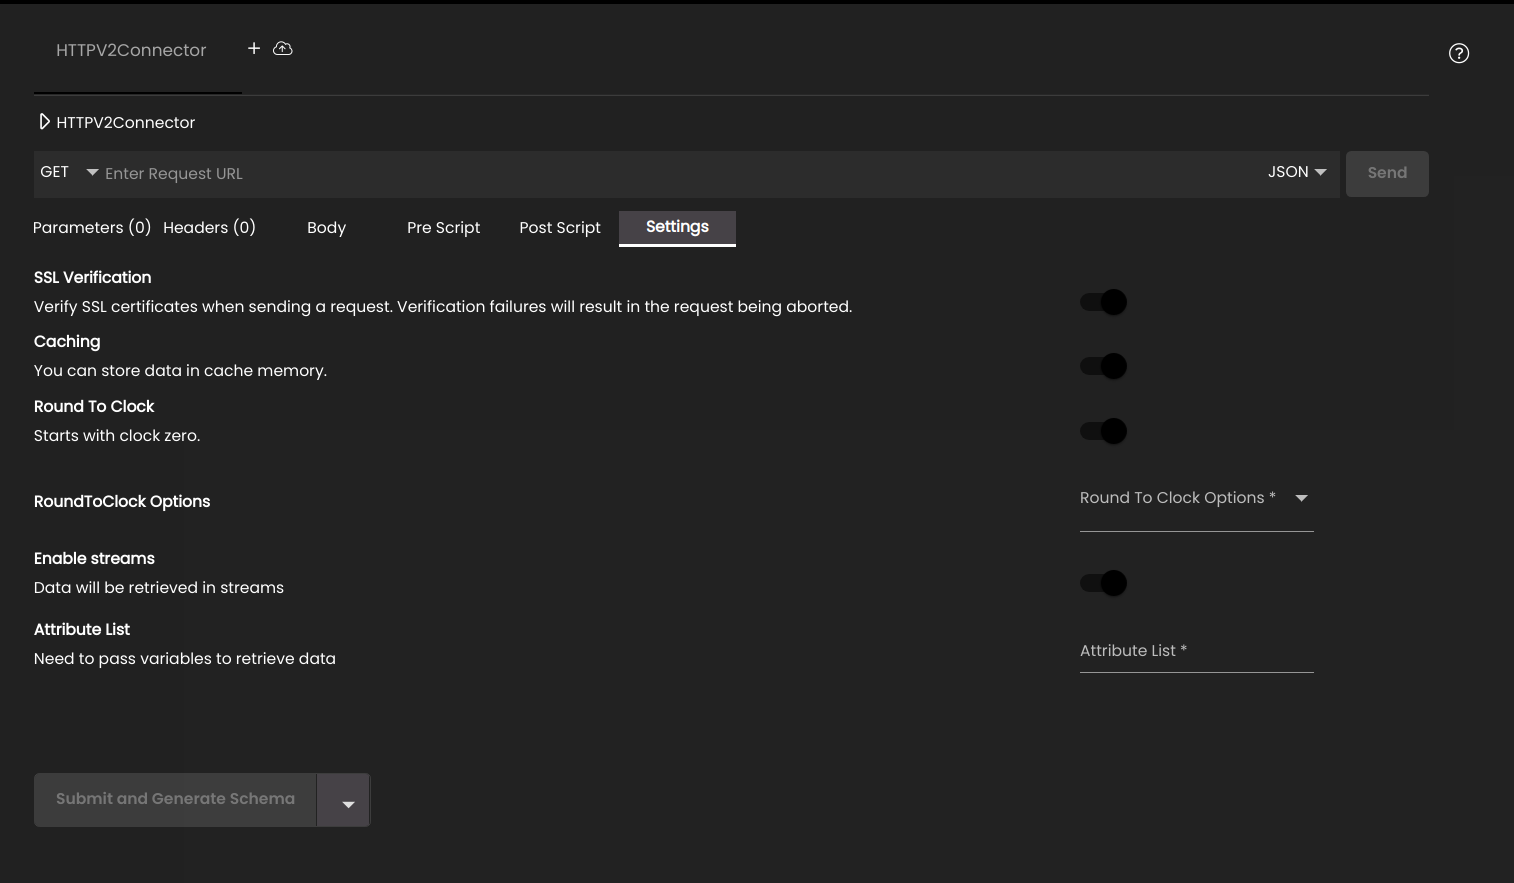
Settings
Helps configure the following settings:
SSL Verification - Select whether or not to bypass the process of ensuring the certificate the site holds is valid and identifying it correctly. If it is enabled then the verification of the SSL certificate is done.
Caching - Select whether or not to cache the data for reusability across datasets.
Cache Expiry - The expiry time (in seconds) of the cached data. It is displayed if Caching is enabled.
Round To Clock - Select whether or not to reduce the ingestion time and the data mismatch between different dashboards and databases. It is displayed if Caching is enabled.
Round To Clock Options - The time of reducing the ingestion and data mismatch. It is displayed if Round To Clock is enabled.
Enable Streams - Select whether or not the data can be sent in streams. If this option is selected then the data is sent in blocks as it is received so that the data can be processed a record at a time. If the data is formatted as CSV then it is sent one record at a time; if it is in JSON format then it is sent one object at a time. The dataset can either process each record/object individually and pass it on to the consumer, or it can accumulate all of the fragments and construct a complete CSV file or JSON structure before passing this on to the consumer.
Attribute List - An attribute list used to define the start and end of JSON objects to be streamed. For example, the following list indicates that individual objects whose first attribute is
deviceIdand last attribute issiteInfoshould be streamed:{deviceID siteInfo}.

Adds another tab to add another connector.
Note
A maximum of up to 10 tabs can be added.

Imports cURL commands.
Click the Send button to execute the request and fetch a response.
Click Submit and Generate Schema to create the connector with schema or Submit to create the connector without schema.
Note
You can click on the Help icon  to assist in using the different connector types.