Create a content report
In the top left-hand corner of the main dashboard screen, click the Manage icon:
 .
.On the Manage panel, click Automation
 .
.On the right-hand side of the Content Reports screen, click the Report icon:
 .
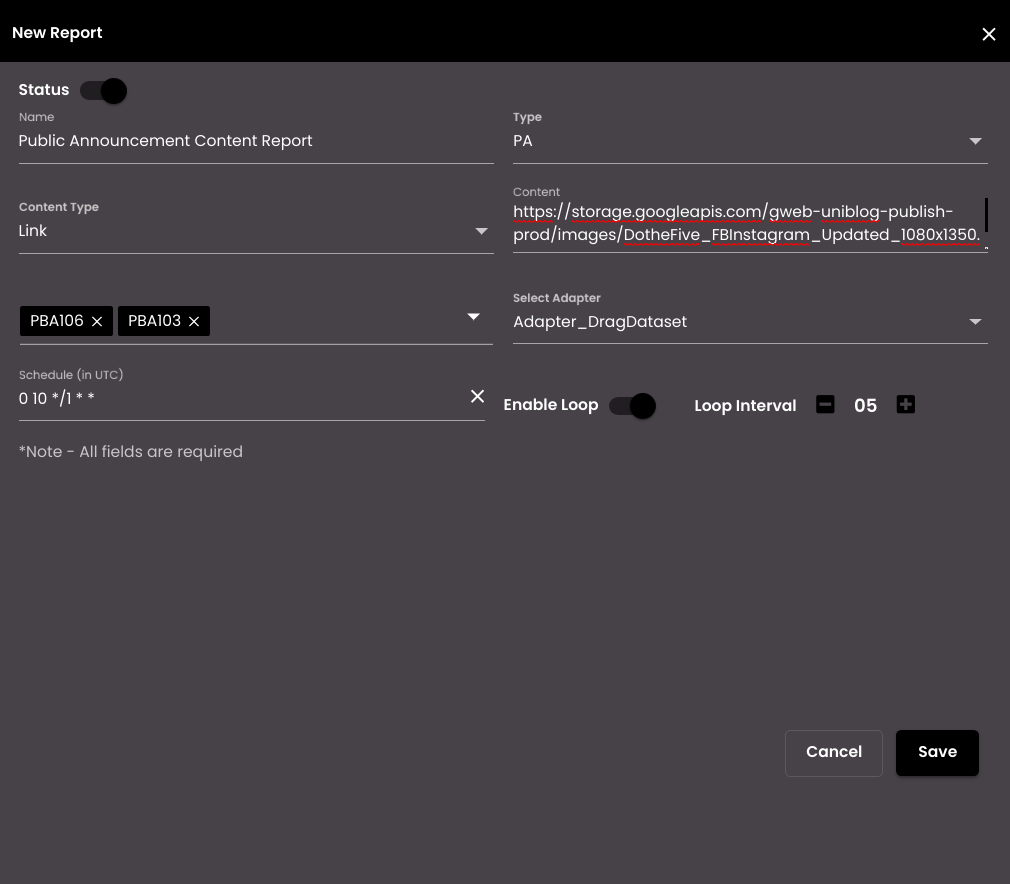
.Configure the content report settings as required:
Setting
Description
Status
Enables or disables the scheduled content report.
Name
The name of the content report.
Type
The type of content report that should be generated.
PA
VMD
Content Type
The type of content in the content report based on the Type selected.
Text
Link (if the Type selected is PA).
Content
The content that is to be displayed in the content report.
Select Devices
The list of devices on which the content can be displayed, based on the Type selected.
Select Adapter
The adapters which are used for the content report.
Note
During adapter creation, they should be Outbound and the Tags field has to be the tag PA for Public Announcement or VMD for Variable Message Display so that it is displayed here to generate content reports. For more information, see Create an Adapter.
Schedule
Triggers the content report at a specific time or a specific frequency in the UTC format, e.g. at 09:00 every weekday.
Minutes - Select how frequently the content report should be triggered in minutes. For example, 'On every 5 minutes' means that the content report will be triggered continuously every 5 minutes.
Hourly - Select how frequently the content report should be triggered in hours. For example, 'On every 1 hour' means that the content report will be triggered continuously every 1 hour.
Daily - Select how frequently the content report should be triggered in days (e.g. every 2 days or every working day), and the time that the content report should be triggered on these days.
Weekly - If the content report is to be scheduled weekly, then select the days (Monday-Sunday), and the time that the content report should be triggered on these days.
Monthly - Select one of the following options:
On the selected month days - select a specific day of the month (e.g. the 2nd), the monthly schedule (e.g. every 3 months), and the time that the content report should be triggered on this day.
On the selected week day - select a specific day of the week (e.g. the first Monday), the monthly schedule (e.g. every 3 months), and the time that the content report should be triggered on this day.
Custom - Specify your own custom schedule period using the standard Cron time string format in the CRON Expressionfield. For example, "30 * * * *" can trigger the content report at 30 minutes past the hour, every hour. "*/15 * * * *" can trigger every 15 minutes. "0 13 * * 1" can trigger at 1pm every Monday.
Enable Loop
If enabled, displays Loop Interval which allows to specify the number of times that you want the public announcement or variable message display selected in Type to be displayed.
Loop Interval
Specify the number of times that you want the public announcement or variable message display selected in Type to be displayed. It is displayed if Enable Loop is enabled.
Note
Allowed values are from 1-10.
Click Save.